
The All-in-One Video Gallery plugin lets you add many videos at once instead of creating them one by one. You can import every video file in a folder on your website, or import videos with their titles, descriptions, categories, and other details from a CSV file. You can also export your videos to a CSV file and their media files to ZIP archives, which is useful for backups, editing your video details offline, or moving your gallery to another website. This document explains each option.
- Open the Bulk Import / Export Page
- Import Videos from a Folder
- Import Videos from a CSV File
- Update Existing Videos with a CSV File
- Export Videos
- Move Videos to Another Website
- Export Email Leads
- Troubleshooting
1. Open the Bulk Import / Export Page
Navigate to Video Gallery → Bulk Import / Export from your WordPress Admin Dashboard. The page is divided into panels. Click a panel’s heading to expand it.
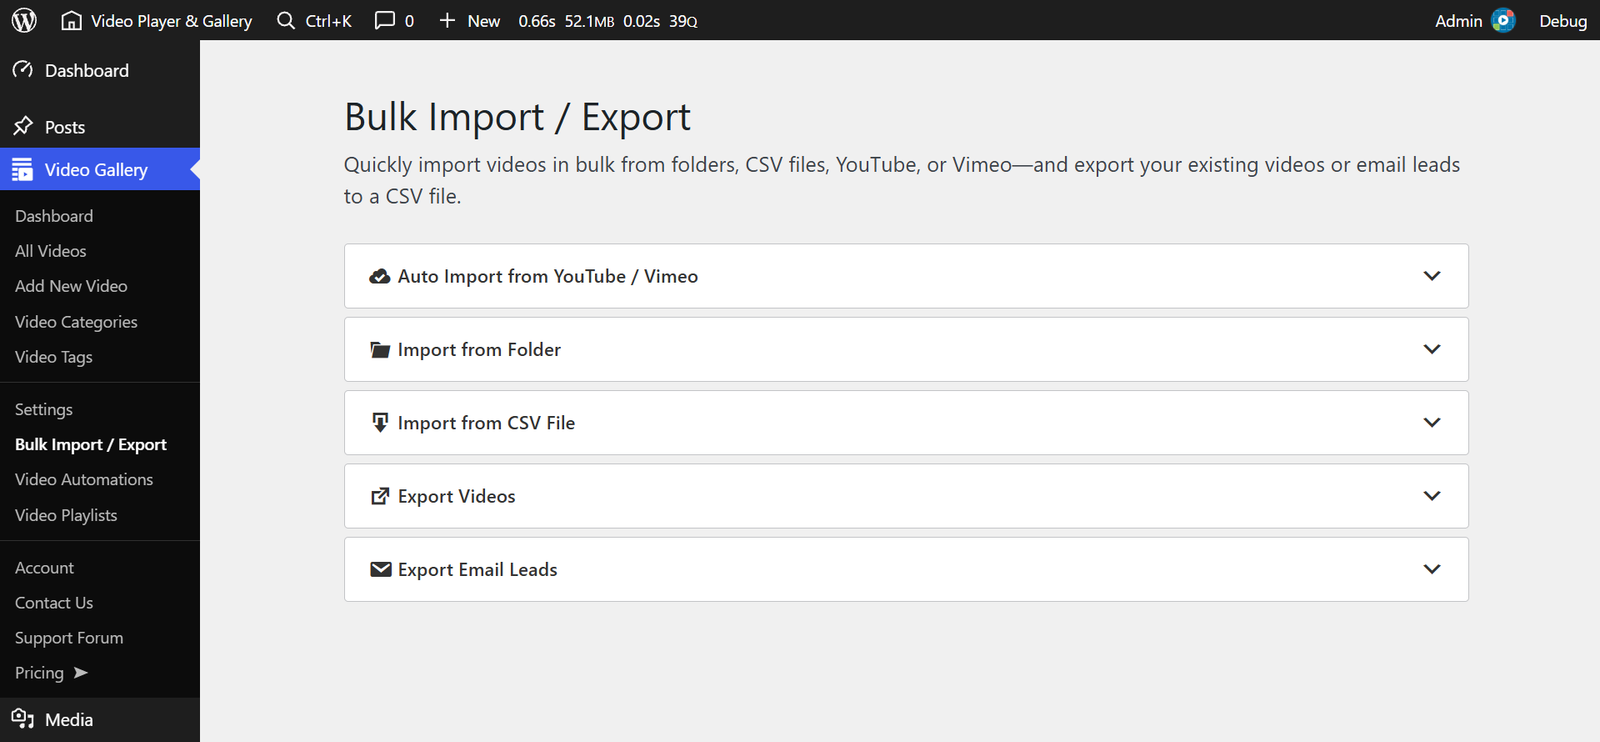
- Auto Import from YouTube / Vimeo (Pro) – Automatically imports videos from a YouTube or Vimeo channel, playlist, or account, and keeps them in sync. See the Auto Import YouTube Videos and Auto Import Vimeo Videos tutorials.
- Import from Folder – Creates a video for every video file in a folder on your website.
- Import from CSV File – Creates or updates videos from the rows of a CSV file, optionally with the media files in a ZIP archive or a folder.
- Export Videos – Downloads your videos as a CSV file, and their media files as ZIP archives.
- Export Email Leads – Downloads the email leads captured from your videos as a CSV file. This panel appears only when email capture is enabled.
Imports and exports run in small batches, and the status below the button updates as each batch finishes. Keep the page open until the final message appears. If you close the tab or leave the page, the process stops partway. Videos imported up to that point are kept.
Note: If your server’s PHP memory limit is below 256 MB or its maximum execution time is below 120 seconds, a red notice appears at the top of the import and export panels. You can still continue, but large imports may time out. Ask your hosting provider to raise these limits before importing a large number of videos.
2. Import Videos from a Folder
Use this method when your video files are already on your web server. The plugin scans the folder and creates one published video for each video file it finds, using the file name as the video title. For example, my_first-video.mp4 becomes My First Video.
Before you start, upload your files to a folder inside your WordPress installation using FTP or your hosting file manager, for example wp-content/uploads/my-videos/.
- Supported video formats: mp4, webm, ogv, m4v, mov.
- Poster images: To add a poster image to a video, place an image file with the same name in the same folder, for example
my_first-video.jpgnext tomy_first-video.mp4. Supported image formats are jpg, jpeg, png, gif, and webp.
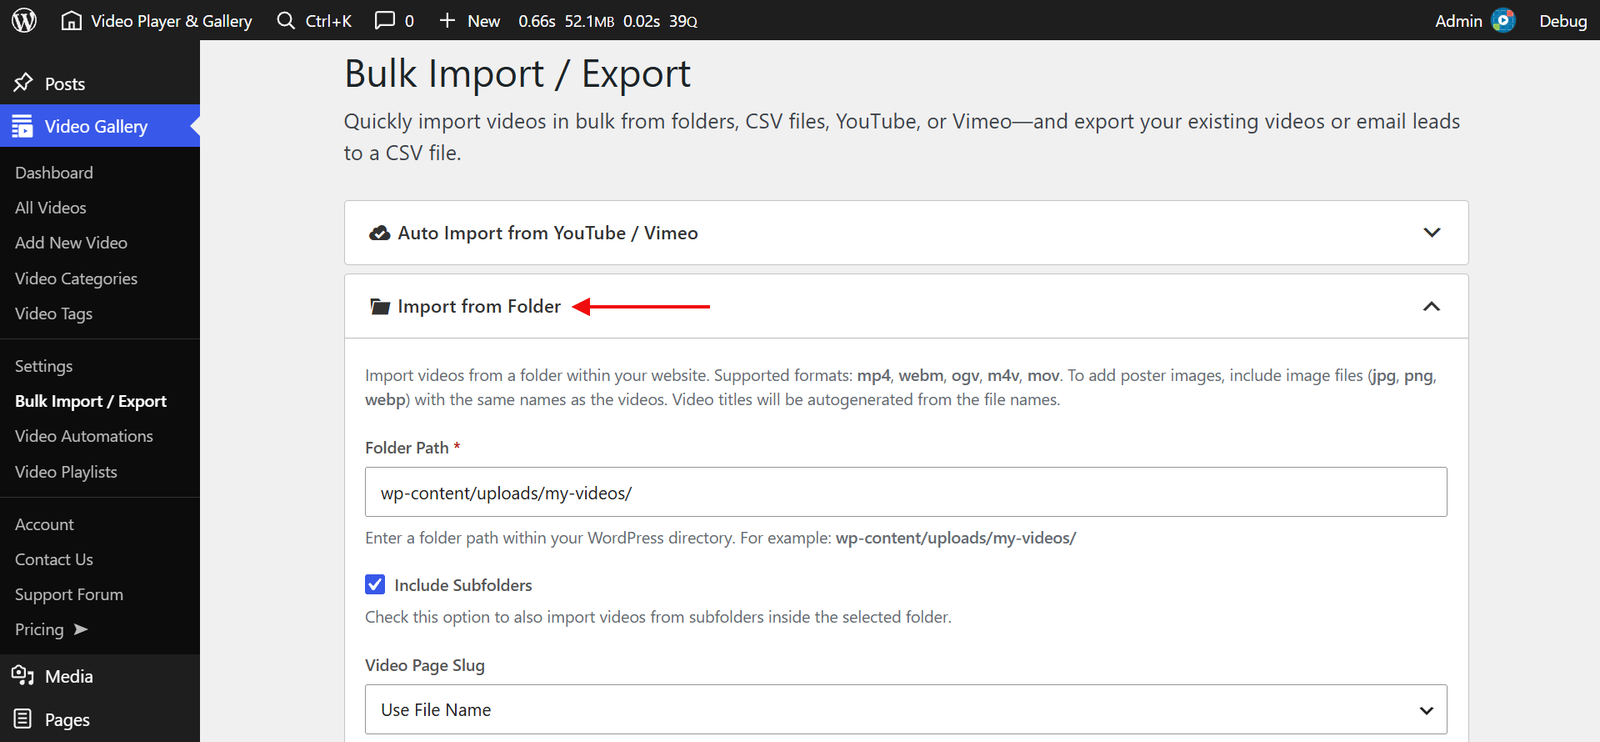
- Navigate to Video Gallery → Bulk Import / Export and expand the Import from Folder panel.
- In Folder Path, enter the folder’s path relative to your WordPress root folder (the folder that contains
wp-config.php), for examplewp-content/uploads/my-videos/. Do not enter a URL. - Check Include Subfolders if you also want to import videos from the folders inside it.
- Under Video Page Slug, choose how the video page URLs are built:
- Use File Name – The URL is based on the video title.
- Generate Secure Random Slug (Recommended) – The URL uses a random string, which makes it harder for visitors to guess the names of your video files. This option is selected by default when restrictions are enabled.
- Select the Video Categories and Video Tags to assign to all the imported videos. Create them first under Video Gallery → Video Categories and Video Gallery → Video Tags if they do not exist yet.
- Check Set Featured Images to add each matching poster image to your Media Library and use it as the video’s featured image.
- Leave Enable Downloads checked to let visitors download the imported videos, or uncheck it.
- Leave Allow Comments checked to allow comments on the imported videos, or uncheck it.
- If you see Email & Lead Capture, choose — Default —, Enable, or Disable for the imported videos.
- If you see Access Control, choose who can watch the imported videos: — Global —, Everyone, Logged out users, or Logged in users. If you choose Logged in users, you can also select the Allowed User Roles.
- Click Scan & Import.
When the import finishes, you see a summary such as “12 videos imported, 3 excluded as duplicates, and 0 failed to import.” Click Click here to view the imported videos to open the All Videos list showing only the videos from this import.
Note: A file that has already been imported is skipped and counted as a duplicate. After you add new files to the folder, you can run the same import again, and only the new files are imported. The Email & Lead Capture field appears only when email capture is enabled, and the Access Control field appears only when restrictions are enabled.
3. Import Videos from a CSV File
Use this method when you want to import more than the video files themselves, such as titles, descriptions, categories, tags, subtitles, chapters, and authors. Each row of the CSV file becomes one video. The videos can be hosted anywhere: on your website, on YouTube, Vimeo, Dailymotion, Rumble, or Facebook, or as HLS or MPEG-DASH streams.
Prepare Your CSV File
The first row of the file must contain column headings, and each row after it describes one video. Every row needs a video title and a video source. All other columns are optional. To get started quickly, download the sample files linked in the Import from CSV File panel: sample-videos.csv and sample-videos.zip.
During the import, you match each column to one of the following video fields:
- Video Title (required) – The video’s title.
- Video File (required) – The video URL (mp4, webm, ogv, and other self-hosted files, an HLS
.m3u8or MPEG-DASH.mpdURL, or a YouTube, Vimeo, Dailymotion, Rumble, or Facebook URL), an embed code, or just a file name such asmy-video.mp4when the file is inside your ZIP file or folder. - Poster Image – An image URL, or just a file name such as
my-video.jpgwhen the file is inside your ZIP file or folder. - Video Description and Video Excerpt – Text. HTML formatting is allowed.
- Video Categories and Video Tags – One or more names, separated by the Multi Values Separator. Use
>for subcategories, for exampleSports > Football ; Movies > English > Comedy. The video is assigned to the parent categories as well. You can also use category or tag IDs. - Subtitles and Chapters – These use the format written by the plugin’s own CSV export. The easiest way to fill them is to export a video that already has subtitles or chapters and copy its format.
- Video Duration – The length of the video, for example
5:32. - Views Count, Likes Count, Dislikes Count – Numbers.
- Enable Download and Featured –
1for yes,0for no. - Email & Lead Capture –
-1for Default,1for Enable,0for Disable. - Lead Notification Email – One or more email addresses, separated by commas, that are notified of leads from this video.
- Access Control –
-1for Global,0for Everyone,1for Logged out users,2for Logged in users. - Allowed User Roles – Role names such as
subscriberoreditor, separated by the Multi Values Separator. - Comment Status –
opento allow comments. - Video Status – For example
publish,draft, orpending. New videos are published when this is empty. - Video Author – The author’s email address, username, or user ID.
- Published Date – For example
2026-01-15 10:30:00. - Video ID (existing video) – Used only to update existing videos. See Update Existing Videos with a CSV File.
Note: When you refer to a file in your ZIP file or folder by its name, use only letters, numbers, hyphens, and underscores in the name, for example my-video_01.mp4. File names that contain spaces or extra dots are not matched.
Run the Import
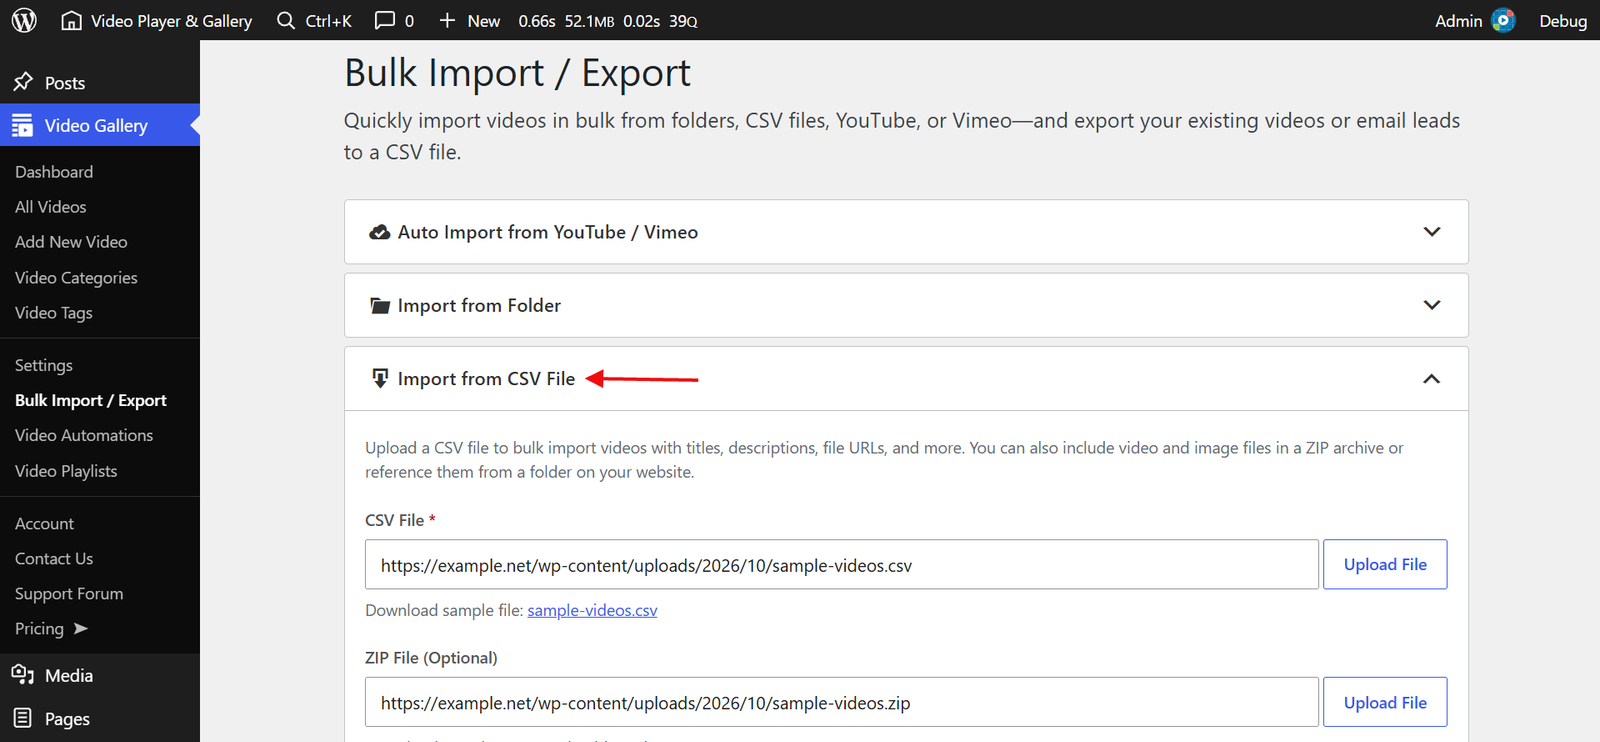
- Navigate to Video Gallery → Bulk Import / Export and expand the Import from CSV File panel.
- If your CSV file uses a character other than a comma between columns, enter it in Columns Separator first. The columns are read as soon as you upload the file.
- Under CSV File, click Upload File and upload or select your CSV file in the Media Library. The plugin reads the column headings and shows the Map CSV Columns to Video Fields section.
- If your CSV refers to video, image, or subtitle files by name, provide those files under ZIP File (Optional). Either click Upload File to upload a ZIP archive, or enter the path of a folder on your website that contains the files, for example
wp-content/uploads/my-videos/. A folder is the better choice for large files, because a ZIP upload is limited by your server’s maximum upload size. - In Multi Values Separator, enter the character that separates multiple values in one cell, such as several categories. The default is
;. - Leave Create Missing Categories / Tags checked to create any category or tag in the file that does not exist yet. If you uncheck it, unknown categories and tags are skipped and reported.
- Leave Create Missing Authors checked to create a new user when an author’s email address in the file does not match an existing user. This works only for email addresses, not usernames.
- Check Set Featured Images to add each video’s poster image to your Media Library and use it as the featured image. This requires a Poster Image column.
- In Map CSV Columns to Video Fields, choose a video field for each column of your file. Columns whose headings match a field name are matched automatically. Leave a column on — Select Field — to ignore it. You must map Video Title and Video File.
- Click Import Videos.
When the import finishes, you see a summary of how many videos were imported, updated, excluded as duplicates, and failed, followed by a Click here to view the imported videos link that opens the All Videos list showing only the videos from this import. If any rows had problems, they are listed below the summary by line number, for example “Line #4: My Video – Video already exists.” Line #1 is the heading row, so the first video is on line #2.
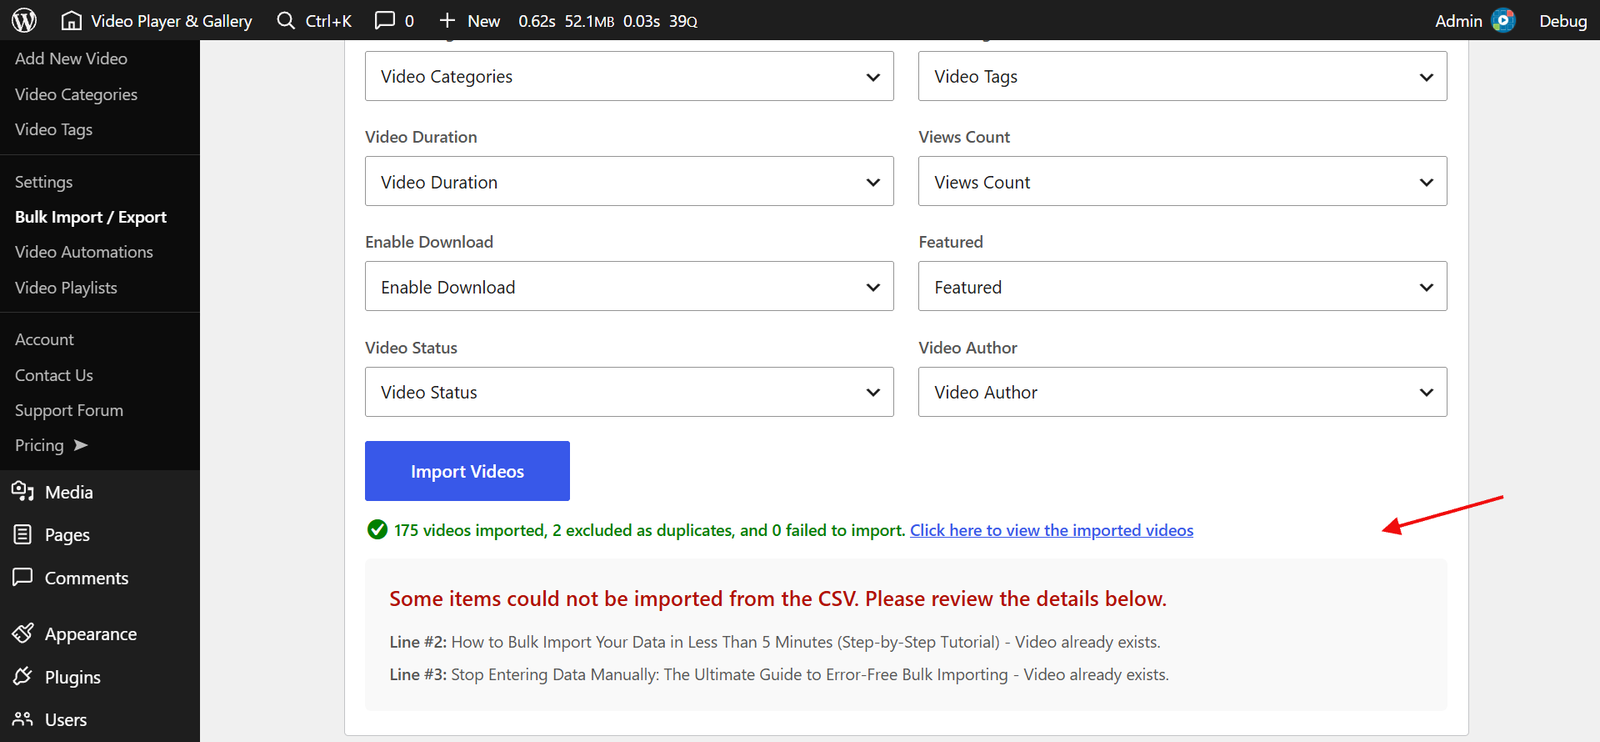
- A row is skipped as a duplicate when a video with the same video source already exists on your website. You can safely run the same file again after an interrupted import, and the rows already imported are skipped.
- When Comment Status is not in the file, new videos follow the Comments setting under Video Gallery → Settings → Display → Single Video Page.
- If the author in a row cannot be found, the video is still imported and the problem is listed in the results. A new video is assigned to you as its author.
- Files from an uploaded ZIP are extracted to
wp-content/uploads/all-in-one-video-gallery/imports/, and your videos play from there, so do not delete that folder. Files of a type WordPress does not allow in uploads are removed during extraction.
Note: When the import is complete, the CSV file and ZIP file you uploaded are deleted from your Media Library. Files you referenced through a folder path are never deleted.
4. Update Existing Videos with a CSV File
You can also use a CSV import to change many existing videos at once, for example to fix titles or move videos to different categories. The easiest way is to export your videos, edit the file, and import it again.
- Click Export CSV in the Export Videos panel and download the file. See Export Videos.
- Edit the file in a spreadsheet application and save it as CSV. Keep the Video ID (existing video) column unchanged. You can delete the rows you do not want to change.
- Import the file as described in Import Videos from a CSV File.
- In Map CSV Columns to Video Fields, select Video ID (existing video) for the ID column yourself. It is never matched automatically, so that a file from another website cannot overwrite your videos by accident.
- Click Import Videos. Updated rows are counted as “updated” in the summary.
Keep the following in mind when updating:
- Each row still needs a Video Title and a Video File.
- Most fields you do not map are left unchanged. A mapped column replaces the existing value, and an empty cell clears it. For example, an empty Video Categories cell removes all categories from that video.
- If the ID in a row does not belong to an existing video on this website, the row is imported as a new video instead.
Important: An update always rewrites the video source and the poster image. Always map the Poster Image column when updating videos. If you leave it unmapped, the poster images of the updated videos are removed.
5. Export Videos
The Export Videos panel has two buttons. Use them separately or together.
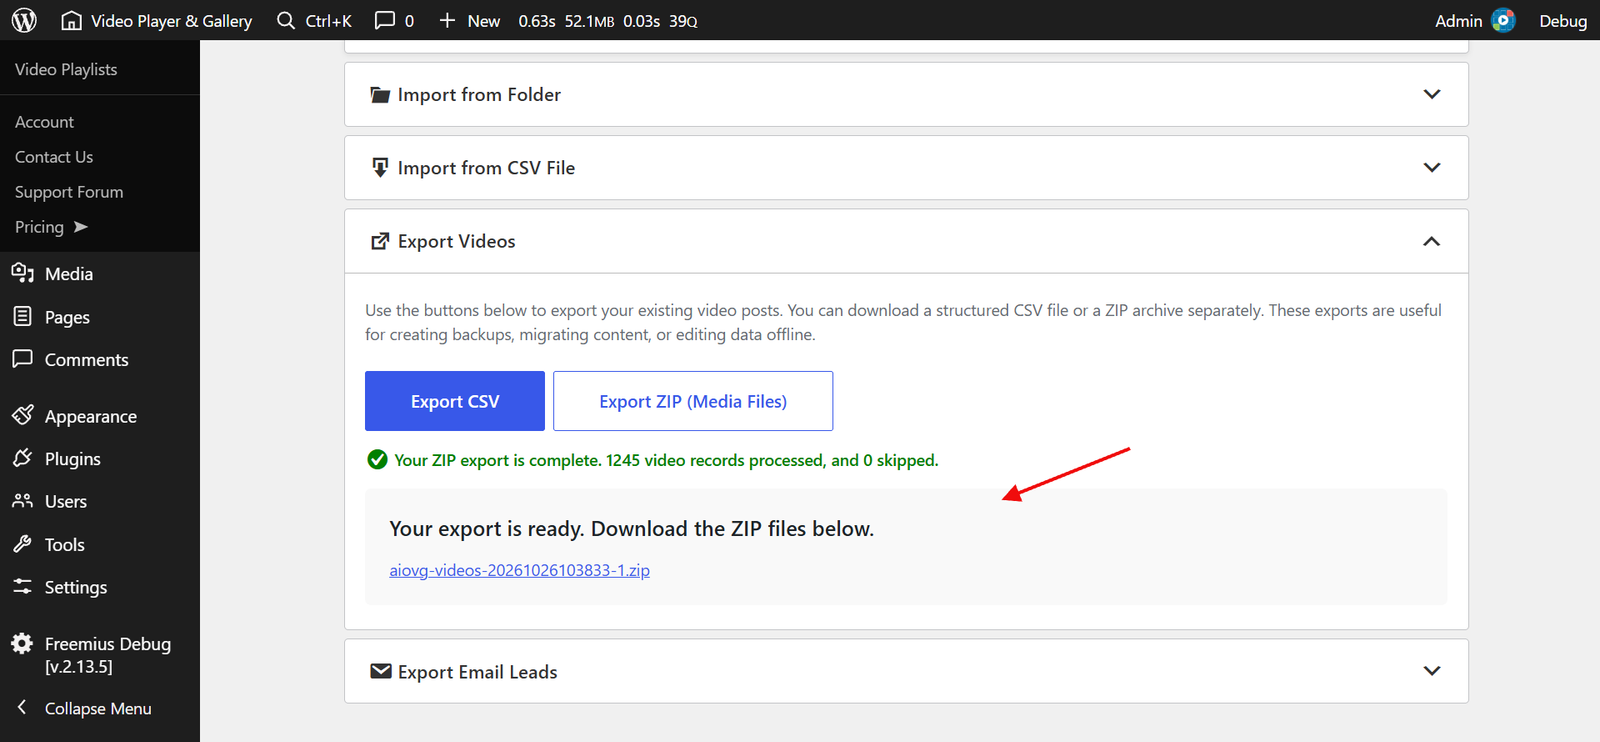
- Navigate to Video Gallery → Bulk Import / Export and expand the Export Videos panel.
- Click Export CSV to export your video details. When it finishes, click Click here to download the CSV file.
- Click Export ZIP (Media Files) to export the media files. When it finishes, download each ZIP file listed under Your export is ready. Download the ZIP files below.
What the CSV file contains: One row for each published video, with a column for every field listed in Prepare Your CSV File. The headings match the field names, so the file maps automatically when you import it again. Categories are written with their parent categories (for example Sports>Football), and authors are written as email addresses.
What the ZIP files contain: The files that are stored on your website for each published video:
- Self-hosted video files, including additional quality versions
- Poster images
- Subtitle files
Each file name starts with its video ID, for example 25-my-video.mp4. YouTube, Vimeo, Dailymotion, Rumble, Facebook, and embed code videos, HLS and MPEG-DASH streams, and files hosted on another domain or CDN are not included. Each ZIP file holds up to 1 GB, and a new one is started when that size is reached. A single file larger than 1 GB is skipped and listed after the export.
Note: Only published videos are exported. Draft, pending, and private videos are not included. Exported files are deleted from your server automatically about 24 hours after your most recent export, so download them right away.
6. Move Videos to Another Website
The CSV export and the ZIP export work together. The CSV file records which media file belongs to each video, and the importer uses that information to link each video to its copy of the file on the new website.
Step 1 – On the old website, click Export CSV and then Export ZIP (Media Files), and download all the files.
Step 2 – On the new website, install and activate All-in-One Video Gallery, then navigate to Video Gallery → Bulk Import / Export and expand the Import from CSV File panel.
Step 3 – Upload the exported CSV file under CSV File.
Step 4 – Provide the media files under ZIP File (Optional):
- If the export produced a single, small ZIP file, click Upload File and upload it.
- If the export produced several ZIP files, or a ZIP file too large to upload, extract all of them into one folder on the new website using FTP or your hosting file manager, for example
wp-content/uploads/my-videos/. Then enter that folder path in the field.
Step 5 – Leave Create Missing Categories / Tags and Create Missing Authors checked so that your categories and authors are recreated. Check the column mapping, then click Import Videos.
Note: If you import the CSV file without the media files, the imported videos keep playing from the old website’s URLs and stop working once that website is gone. Authors that do not exist on the new website are created as new user accounts, with their email address as the username.
7. Export Email Leads
If you collect email addresses with the Email & Lead Capture feature, you can download them from the Export Email Leads panel. The panel appears only when the Email Capture setting under Video Gallery → Settings → Engagement → Email & Lead Capture is not set to Disabled.
- Navigate to Video Gallery → Bulk Import / Export and expand the Export Email Leads panel.
- Optionally, pick a Start Date and an End Date to export only the leads captured in that period. Leave both empty to export all leads.
- Click Export CSV. The file downloads immediately.
The file contains the Email Address, Name, Phone Number, Video Title, Video ID, Page URL, and Date of each lead.
8. Troubleshooting
- “Sorry, the folder path provided is invalid.” – Check the spelling of the path and enter it relative to your WordPress root folder, for example
wp-content/uploads/my-videos/, not as a URL or a full server path. - “Sorry, the folder must be located inside your WordPress directory.” – Move your files into a folder inside your WordPress installation, such as
wp-content/uploads/. - “Sorry, the selected file is not a valid CSV.” – Upload the file with the Upload File button instead of typing or pasting a URL, and make sure the file name ends in
.csv. - The column mapping shows a single column, or the wrong columns. – The Columns Separator does not match your file. Correct it, then upload the CSV file again so that the columns are read again.
- “Invalid video title or source.” – The row’s title or video cell is empty, or the Video Title or Video File field is not mapped.
- “Video already exists.” – A video with the same video source is already on your website, so the row was skipped. To change that video instead, follow Update Existing Videos with a CSV File.
- A category or tag was not assigned, with a “not found” message. – Check Create Missing Categories / Tags and import again, or create the category first.
- Videos from the ZIP file or folder point to the wrong place or do not play. – Check that each file name in the CSV matches a file in the ZIP or folder exactly, and that the name contains only letters, numbers, hyphens, and underscores.
- “Something went wrong. Please check your server or try again.” – A batch timed out or the server returned an error. Ask your hosting provider to raise the PHP memory limit and maximum execution time, then run the import again. Videos that were already imported are skipped as duplicates.
- “ZIP creation is not supported on your server.” – The ZIP export needs the PHP ZIP extension. Ask your hosting provider to enable it.
- “…no ZIP file was created because no files were found.” – None of your published videos have media files stored on your website, for example because they are all YouTube or Vimeo videos. The CSV export is all you need in that case.
- A download link from an earlier export no longer works. – Exported files are removed about 24 hours after your most recent export. Run the export again.
That’s it! You can now add videos to your gallery in bulk, update them from a spreadsheet, and keep a complete backup of your videos and their files.