
Using the “Email & Lead Capture” feature, you can display an email gate form over your videos to collect visitor emails and build your lead list. The form can appear before the video starts, at a specific point during playback, or after the video finishes. You decide which videos show it, how often a visitor is asked, and who is emailed each time a lead comes in. Captured leads are stored in your WordPress database and can be exported to a CSV file at any time.
- Enable Email & Lead Capture
- Configure When to Show the Form
- Control How Often the Form Appears
- Customize the Form
- Override Per Video or Embed
- Get Notified When a Lead Is Captured
- Route Each Client’s Leads Automatically
- Export Email Leads
- For Developers
- Coming Soon
Enable Email & Lead Capture
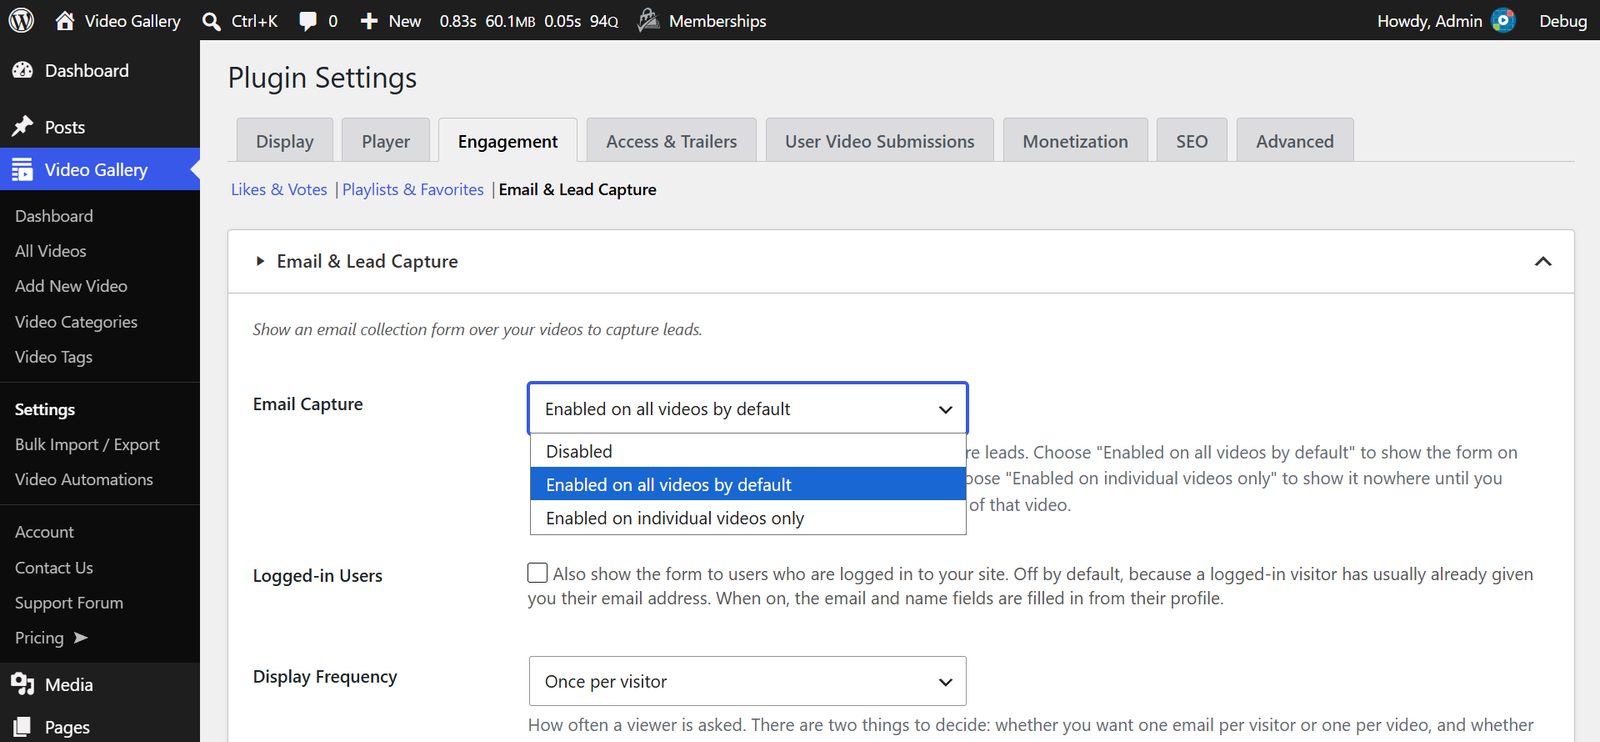
- Navigate to the “Video Gallery → Settings” menu from your WordPress Admin Dashboard.
- Click on the “Engagement” tab, then select the “Email & Lead Capture” submenu.
- Use the “Email Capture” dropdown to choose how the form is enabled:
- Disabled: The form is not shown on any video.
- Enabled on all videos by default: Every video shows the form, and you can switch it off on individual videos.
- Enabled on individual videos only: No video shows the form until you switch it on for that video. Use this when only a few of your videos should collect leads.
- Click “Save Changes” to apply.
Note: When a video has a trailer and a visitor does not have access to the full video, the trailer is shown in its place — and the email form appears on the trailer too.
Logged-in Users:
By default, the form is shown only to visitors who are not logged in to your site, because a logged-in visitor has usually already given you their email address. Check the “Logged-in Users” option to show the form to logged-in users as well. When this option is on, the email and name fields are filled in automatically from the user’s WordPress profile, so they only need to click the submit button.
If you cache pages for logged-in users: With this setting on, the form is filled in from the visitor’s own profile, so the page contains their email address. Almost every caching plugin skips logged-in visitors automatically and nothing more is needed. If yours is configured to cache them, exclude pages with videos — or leave this setting off.
Configure When to Show the Form
Once the feature is enabled, you can choose at what point during playback the email form should appear. Enable the position where you want to ask for the visitor’s email:
Before the Video:
Check the “Before the Video” option to display the email form immediately before the video starts. Visitors must submit the form (or skip it, if skipping is allowed) before playback begins.
During the Video:
Enter a percentage value in the “During the Video (Percentage)” field to pause playback and show the email form when the video reaches that point. For example, enter 50 to show the form at the halfway point. Leave this field empty to disable the mid-roll gate.
Note: The mid-roll gate works only on videos played using the plugin’s built-in player. It does not work with Dailymotion, Rumble, Facebook, or any other third-party player embeds.
After the Video:
Check the “After the Video” option to show the email form once the video finishes playing.
Note: The post-roll gate works only on videos played using the plugin’s built-in player. It does not work with Dailymotion, Rumble, Facebook, or any other third-party player embeds.
One form per page load: The form appears at most once each time the page is loaded, at the first position that is reached. Once the visitor submits or skips it, it stays closed for the rest of that page view — so enabling all three positions does not ask three times. Choose the one position where you most want to ask.
Embed codes that use a script: If your embed code is a <script> tag rather than an <iframe>, the email form cannot appear over that video while “Player Initialization” is set to “JavaScript” — the video is drawn by the provider’s own script, so there is nothing for the plugin to place the form on. Either use the provider’s <iframe> embed code instead, or set “Player Initialization” to “Iframe” in the “Video Gallery → Settings → Player” tab. Embed codes that already use an <iframe> are unaffected.
Control How Often the Form Appears
The “Display Frequency” setting decides whether a visitor is asked again after they have seen the form. There are two things to decide: whether you want one email per visitor or one per video, and whether skipping the form counts as having been asked. Choose one of the following options:
- Once per visitor (default) — The visitor is asked a single time and then never again, on any video, whether they submit or skip.
- Once per visitor, unless they skip — The same, except that skipping does not count: the visitor keeps being asked on the next video until they actually submit once. After that, they are never asked again.
- Once per video — The visitor is asked on every video, but never twice on the same one. Skipping counts as having been asked. Use this when each video should collect its own lead.
- Once per video, unless they skip — The same, except that skipping leaves that video free to ask again. Only a submission stops the form on that video.
- Every time a video is played — Nothing is remembered, so the form returns each time the page is loaded, even after the visitor has submitted it before. Expect more annoyance, and consider enabling “Allow Skipping” with this option.
For visitors who are not logged in, this is remembered in a browser cookie for 30 days. If they clear their cookies or use a different browser, the form will reappear. For logged-in users (when “Logged-in Users” is on), it is remembered in their account instead, so they are not asked again just because they switched browser.
If you use full-page caching: Whether the email form appears depends on a cookie, so configure your caching plugin to bypass the cache when aiovg_email_captured or aiovg_gdpr_consent is set. Most caching plugins have a “never cache when these cookies are present” setting. Without it, visitors may all be served one visitor’s version of the page.
Customize the Form
The following settings let you control which fields appear on the form, what text is displayed, and which email domains are blocked.
Form Fields:
- Collect Name — Check this option to add a “Name” input field to the form.
- Collect Phone Number — Check this option to add a “Phone Number” input field to the form.
- Allow Skipping — Check this option to show a skip link that lets visitors bypass the form and continue watching without submitting their email.
Form Text:
- Header Text — The heading displayed above the form fields. Defaults to
Enter your email to continue watchingif left empty. - Footer Text — Optional small text shown below the form, such as a consent notice or link to your Privacy Policy. HTML links are supported. Example:
By submitting, you agree to receive marketing emails. See our <a href='#'>Privacy Policy</a>. - Button Label — The text displayed on the submit button. Defaults to
Submitif left empty. - Skip Text — The text shown on the skip link. Defaults to
Skipif left empty. Only displayed when “Allow Skipping” is enabled.
Blocked Email Domains:
Enter disposable or unwanted email domains in the “Blocked Email Domains” field, one per line (e.g. mailinator.com, guerrillamail.com). Submissions from these domains will be silently rejected, helping you keep your lead list clean.
Override Per Video or Embed
Whenever the “Email Capture” setting is not set to “Disabled”, you can turn the form on or off at a more granular level: per individual video, or per single video embed (shortcode, widget, or block). Every override offers the same three choices:
- Default — Follows the setting one level up. With “Enabled on all videos by default” the form is shown; with “Enabled on individual videos only” it is not.
- Enable — Always shows the form here.
- Disable — Never shows the form here.
Per Video:
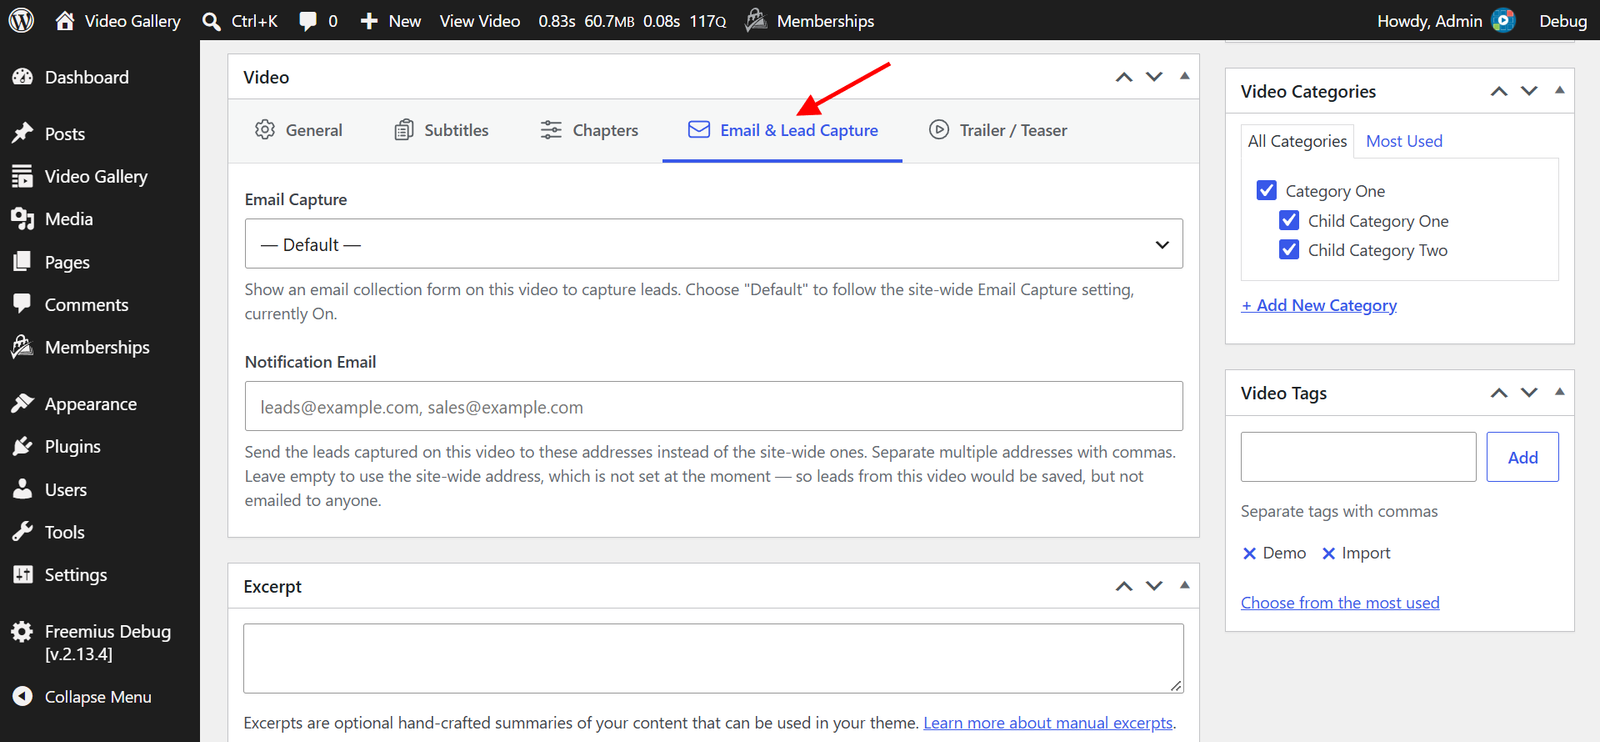
- Navigate to “Video Gallery → All Videos” and open any video for editing.
- Inside the “Video” metabox, click the “Email & Lead Capture” tab.
- Use the “Email Capture” dropdown to choose Default, Enable, or Disable. The description below the dropdown tells you whether Default currently means on or off.
- Click “Update” to save the change.
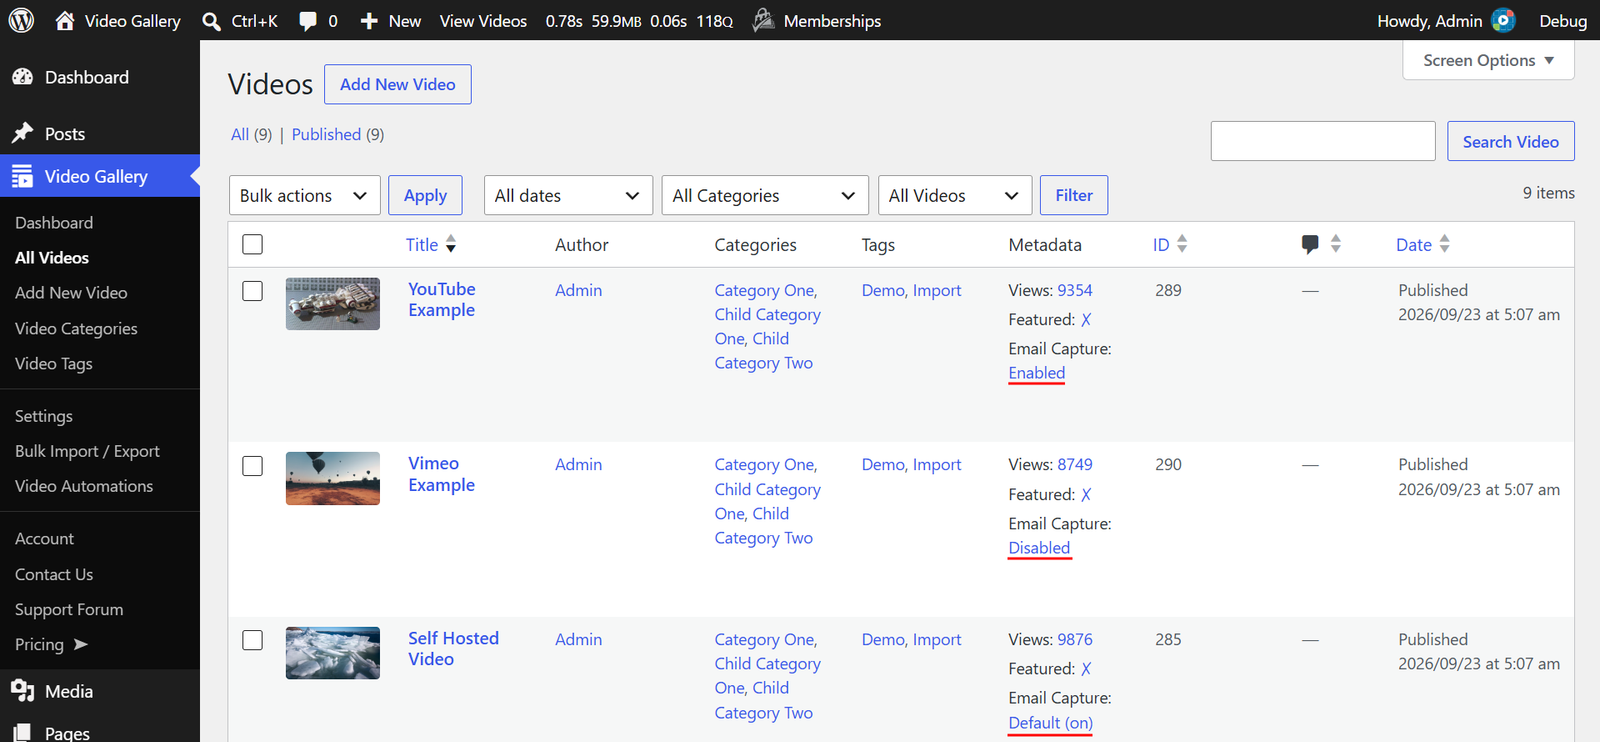
To check the setting across many videos at once, look at the “Metadata” column on the “Video Gallery → All Videos” page. Each video shows “Email Capture: Enabled”, “Disabled”, “Default (On)”, or “Default (Off)”, so you can see at a glance which videos will show the form.
Tip: To change many videos at once, go to “Video Gallery → Bulk Import / Export”, export your videos, edit the “Email & Lead Capture” column (-1 for Default, 1 for Enable, 0 for Disable), and import the file again. Existing videos are matched by the “Video ID (existing video)” column and updated in place.
Per Embed (Shortcode, Widget, or Block):
An “Email & Lead Capture” section also appears in the Shortcode Builder (under the “Single Video” shortcode type), the AIOVG – Video Player widget settings, and the AIOVG – Video Player Gutenberg block sidebar. Use its “Email Capture” dropdown to control the form for that one embed without touching the site-wide setting or the video itself.
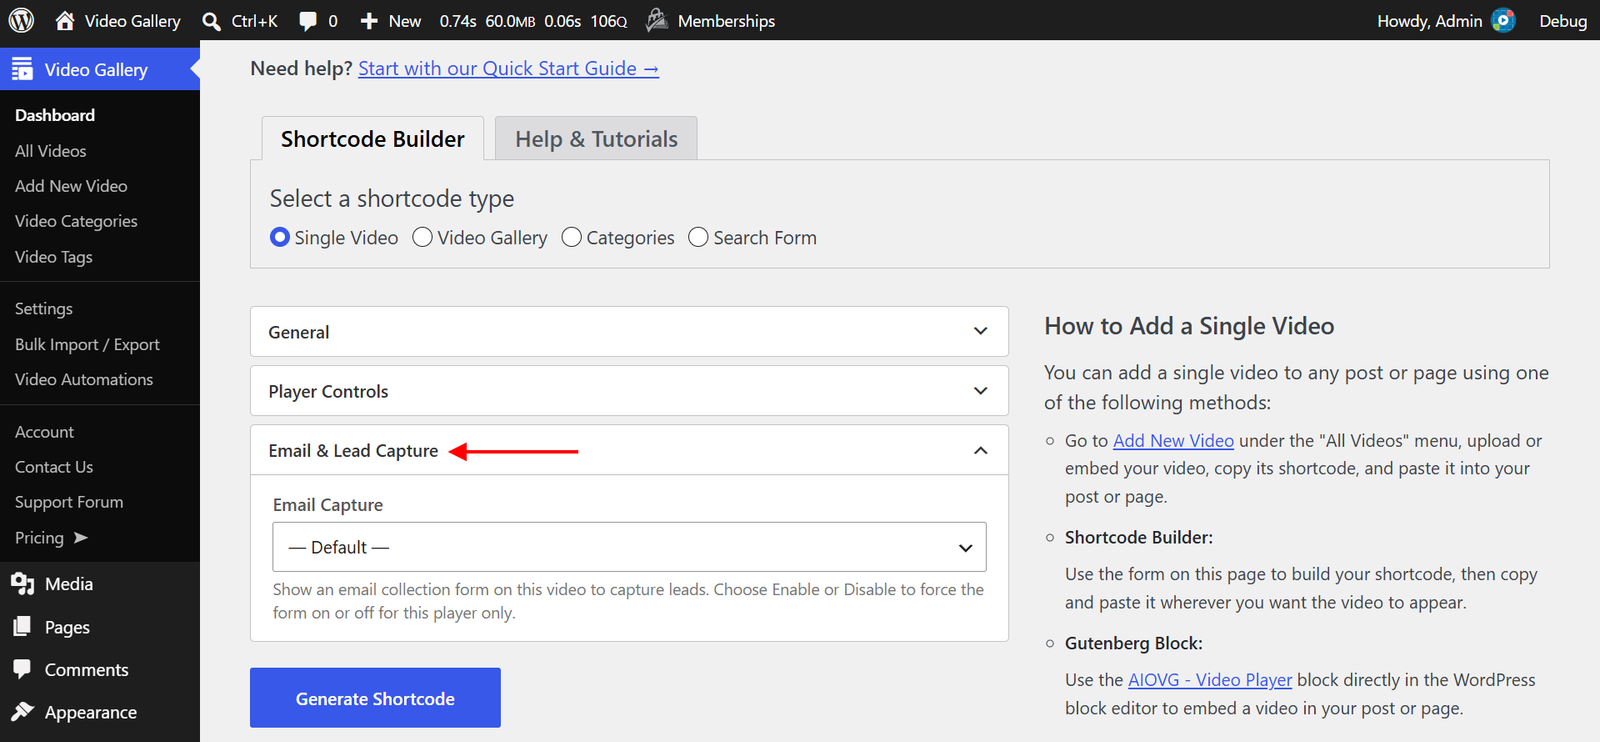
- Default — Follows the video’s own setting, which in turn follows the site-wide setting. This is the default for new shortcodes, widgets and blocks.
- Enable or Disable — Forces the form on or off for this player only.
Note: The per-embed option affects only that specific embed. To change the form for a video everywhere it appears, use the per-video override described above.
Get Notified When a Lead Is Captured
You can have an email sent every time a visitor submits the form, so leads reach you — or your client — straight away. Nothing is emailed until you set this up. Either way, every lead is still saved and can be exported at any time.
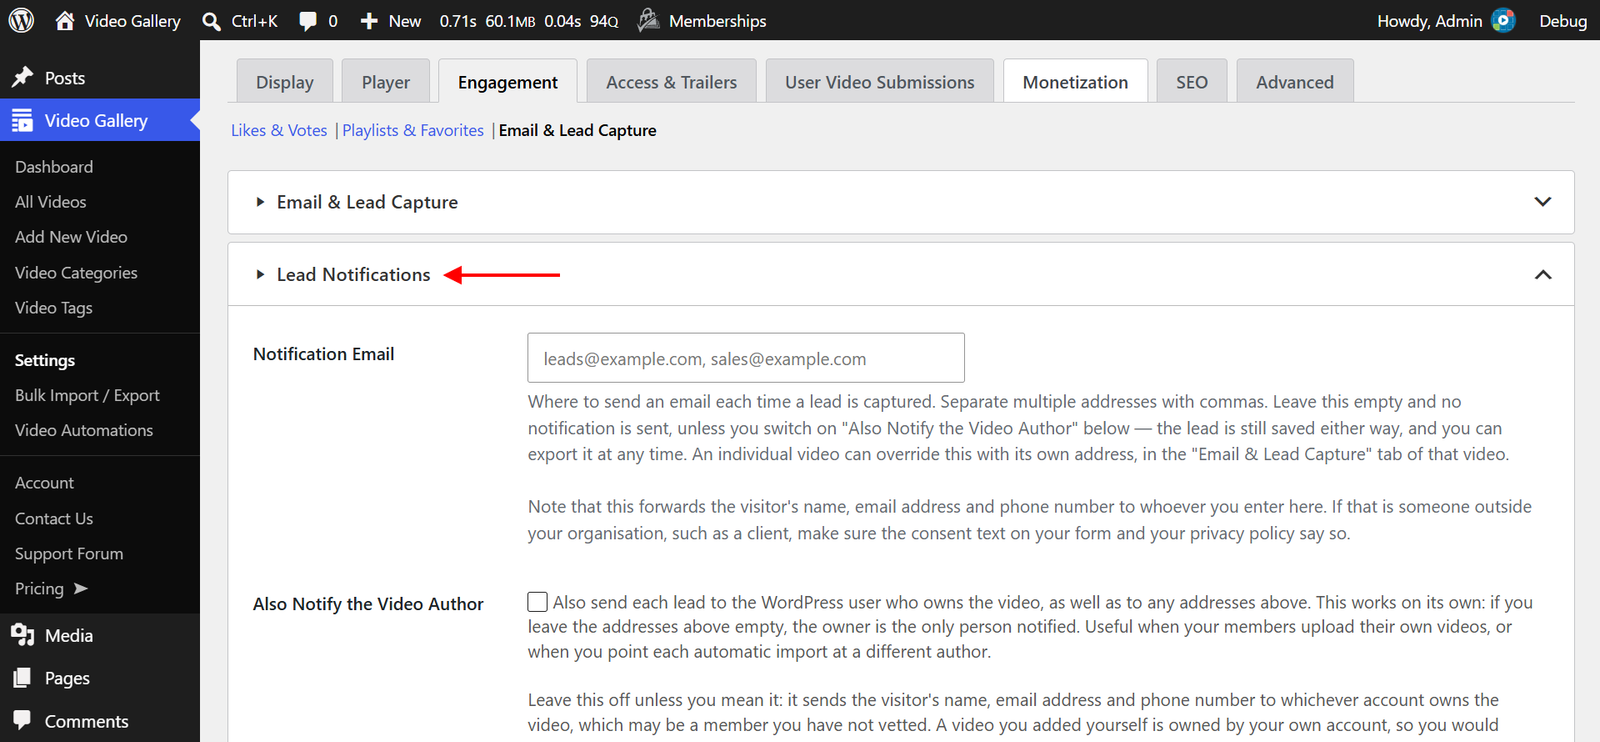
- Navigate to “Video Gallery → Settings”, click the “Engagement” tab, and select the “Email & Lead Capture” submenu.
- Scroll down to the “Lead Notifications” section.
- Enter one or more addresses in the “Notification Email” field. Separate multiple addresses with commas (e.g.
leads@example.com, sales@example.com). - Optionally, check “Also Notify the Video Author” to send each lead to the WordPress user who owns the video as well. This works on its own: if you leave “Notification Email” empty, the owner is the only person notified.
- Edit the “Email Subject” and “Email Body” if you want to change the wording of the notification.
- Click “Save Changes” to apply.
The following placeholders can be used in the subject and body:
{email}— The email address the visitor entered.{name}— The name the visitor entered, if you collect it.{phone}— The phone number the visitor entered, if you collect it.{video_title}— The video’s title.{video_link}— The video’s title with a link.{video_url}— The video’s URL with a link.{page_url}— The page the visitor was watching on.{site_name}— Your site name.{site_link}— Your site name with a link.{today}— The current date.{now}— The current date and time.
Send One Video’s Leads to a Different Address:
If a video belongs to a client, you can send its leads to that client instead of to your site-wide address. Open the video for editing, click the “Email & Lead Capture” tab, and enter one or more addresses in the “Notification Email” field. These addresses replace the site-wide ones for that video; leave the field empty to use the site-wide address. If “Also Notify the Video Author” is on, the video’s owner is notified in addition.
To set up many videos at once, use “Video Gallery → Bulk Import / Export”: export your videos, fill in the “Lead Notification Email” column, and import the file again. An empty cell makes that video use the site-wide address.
Note: A video played from a URL — for example a shortcode, widget, or block that points directly at a video file or YouTube link instead of one of your videos — has no video record behind it. Its leads always go to the site-wide “Notification Email” address, and “Also Notify the Video Author” has no effect on it, because there is no author. To route leads per client, add the video under “Video Gallery → Add New Video” and embed that video instead.
Privacy: Notifications forward the visitor’s name, email address and phone number to whoever receives them. If that is someone outside your organisation, such as a client, make sure the “Footer Text” on your form and your privacy policy say so. “Also Notify the Video Author” is off by default for the same reason — it sends leads to whichever account owns the video, which may be a member you have not vetted.
Route Each Client’s Leads Automatically
If you host videos for many clients and import them with the premium Automations feature, you can have every client’s leads reach that client automatically — without typing an address into any individual video. This works because each automation assigns its imported videos to an author, and “Also Notify the Video Author” emails each lead to the video’s author.
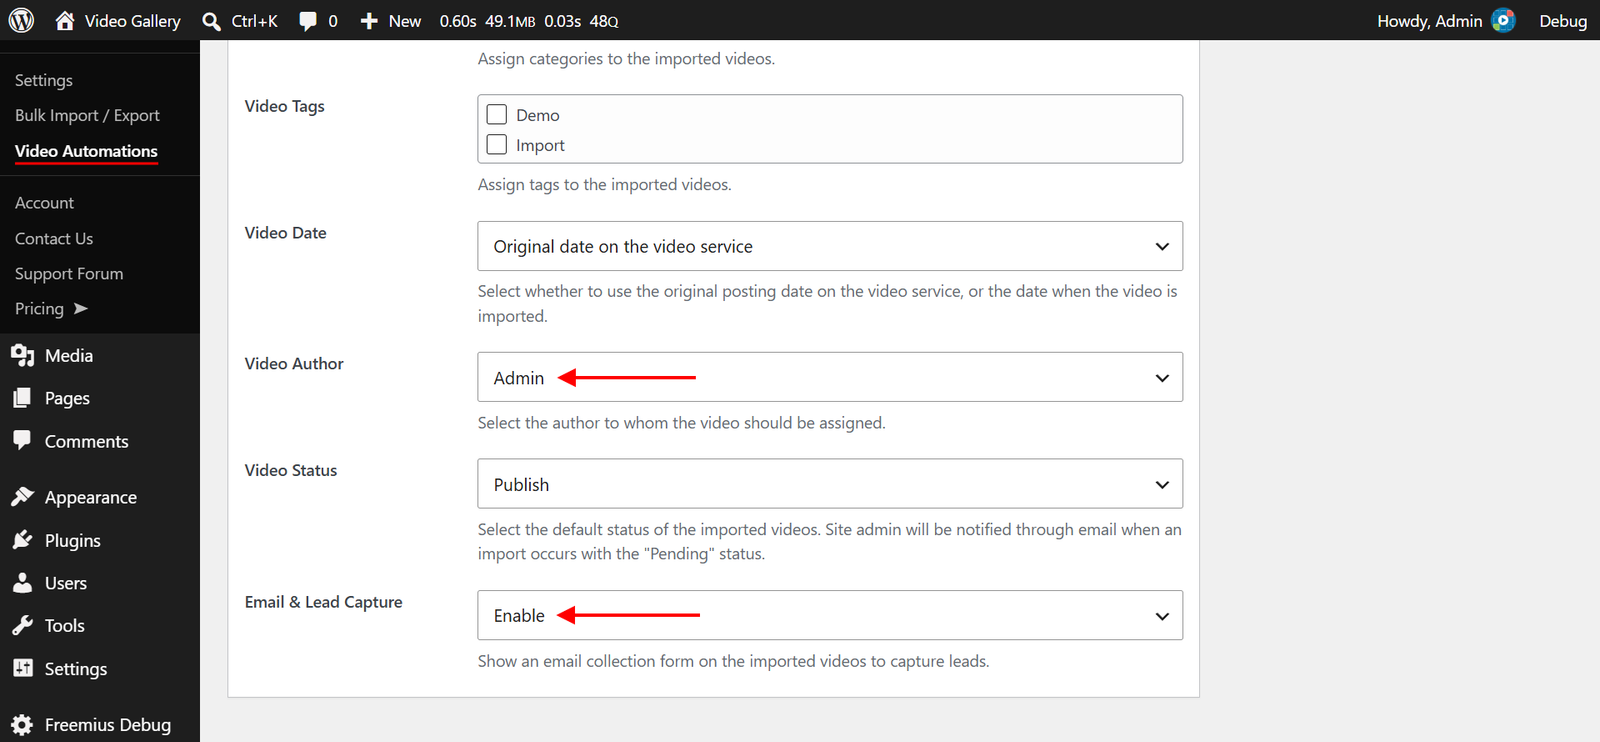
- Create a WordPress user account for each client, using the email address where that client should receive their leads.
- Navigate to “Video Gallery → Video Automations” and create one automation per client (for example, one per client’s YouTube channel or playlist).
- In each automation, set the “Video Author” dropdown to that client’s user account. Every video the automation imports is assigned to that author.
- Navigate to “Video Gallery → Settings → Engagement → Email & Lead Capture”, check “Also Notify the Video Author” in the “Lead Notifications” section, and click “Save Changes”.
From then on, whenever a visitor submits the form on a video imported by a client’s automation, the visitor’s name, email address and phone number are sent to that client’s account email. If you also want a copy yourself, enter your own address in “Notification Email”.
Note: This only helps for videos that are owned by the client’s account. A video you add yourself is owned by your own account, so you would receive those leads. A video played directly from a URL has no author at all, so this option does nothing for it.
Export Email Leads
Captured email leads can be exported to a CSV file in two ways: from the video list page (for a single video) or from the Import / Export page (for all videos with an optional date range filter).
Export Emails for a Single Video:
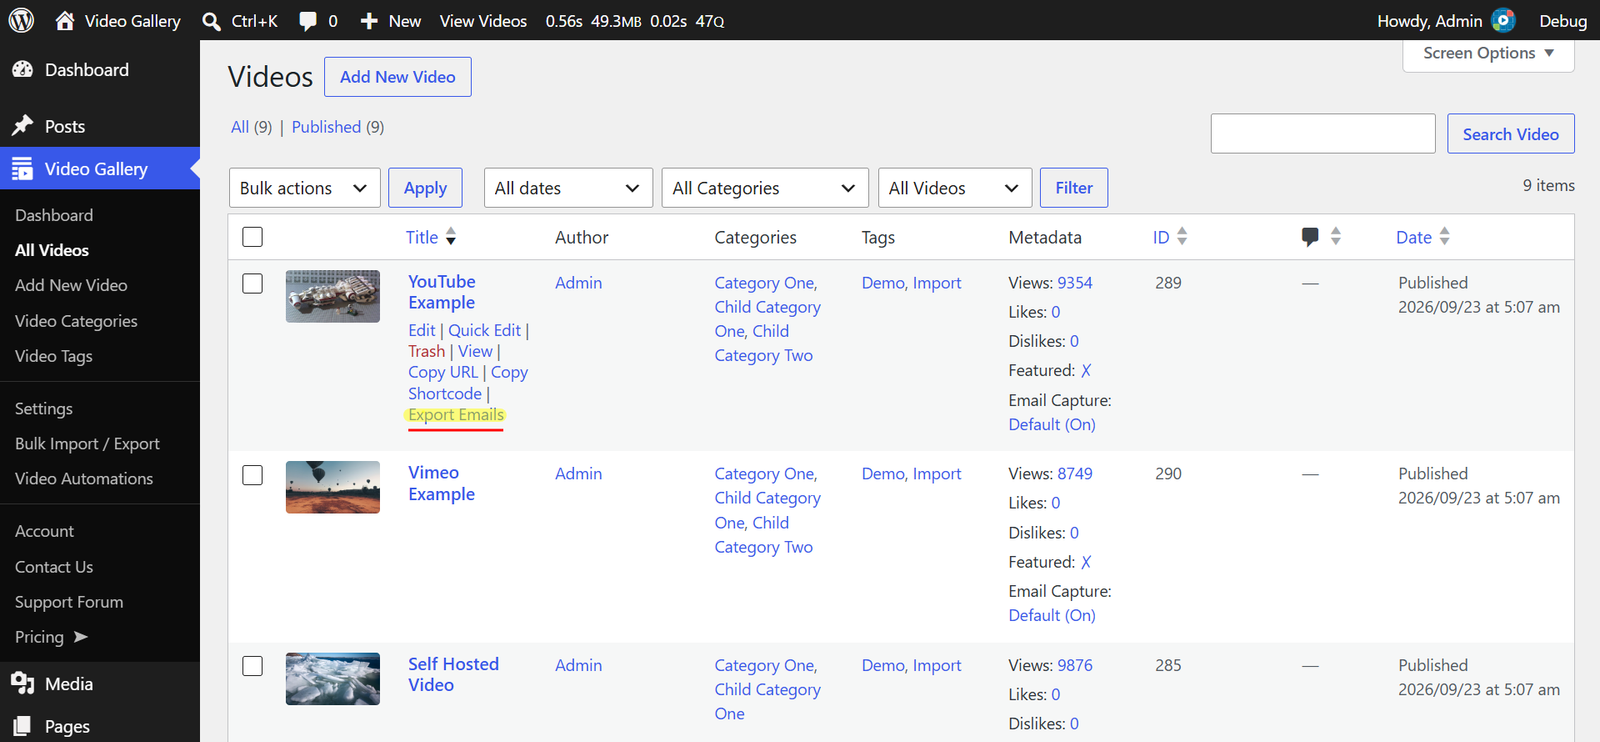
- Navigate to “Video Gallery → All Videos”.
- Hover over the video you want to export leads from. Click the “Export Emails” row action link that appears below the video title.
- A CSV file containing the email leads captured for that video will be downloaded immediately.
You can also export emails directly from within the video edit screen. Whenever the “Email Capture” setting is not “Disabled”, an “Export Emails” button appears at the top of the edit page.
Export All Email Leads with a Date Filter:
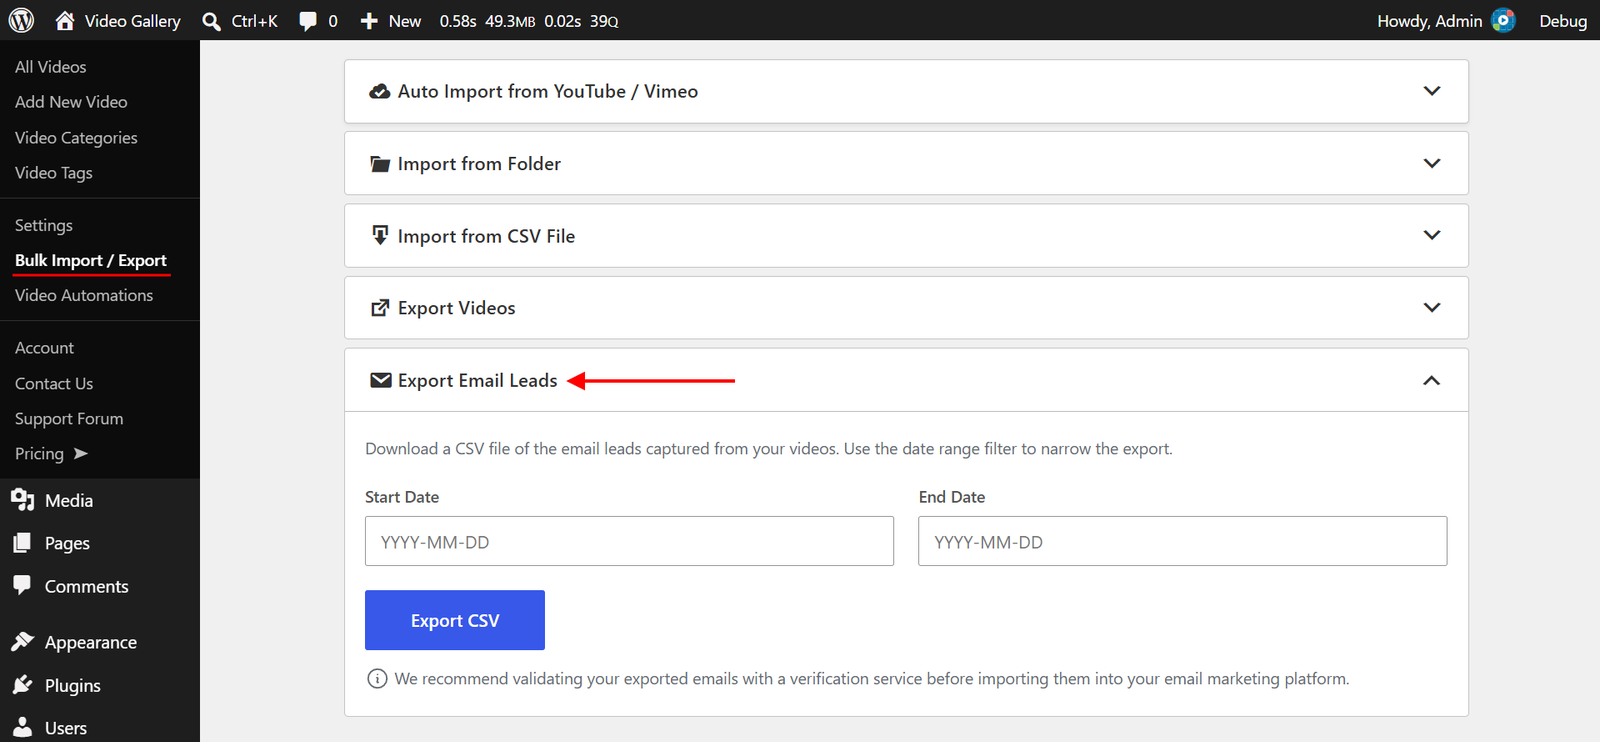
- Navigate to “Video Gallery → Bulk Import / Export” from your WordPress Admin Dashboard.
- Scroll down to the “Export Email Leads” card. This card is only visible when the “Email Capture” setting is not “Disabled”.
- Optionally, enter a “Start Date” and “End Date” (in YYYY-MM-DD format) to filter the export to a specific date range. Leave both fields empty to export all leads.
- Click “Export CSV” to download the file.
Tip: We recommend validating your exported emails with a verification service before importing them into your email marketing platform.
For Developers
Send Leads to a CRM or Webhook:
The aiovg_email_capture_lead_saved action fires once for every captured lead, immediately after it is stored. It receives the stored lead’s ID and an array of the lead data (email, name, phone, video_id, video_url, page_url). It does not fire when a visitor skips the form. Use it to pass leads to a CRM, an email marketing platform, or a webhook.
To take over the decision of whether the form is shown — for example, when your page cache cannot be configured to bypass the cookies above — use the aiovg_email_capture_should_display filter.
Submission Limits:
To protect your site from spam, form submissions are limited per visitor IP address: 10 per video per hour, and 100 across your whole site per hour. Skipping the form never counts towards either limit. When a limit is reached, the visitor sees Too many attempts. Please try again in an hour.
Genuine visitors rarely reach these limits. The exceptions are sites using “Every time a video is played”, where the same visitor can submit on every page load, and places where many people share one IP address, such as a school or an office. To raise the per-video limit, add the following code to your theme’s (or child theme’s) functions.php file:
add_filter( 'aiovg_email_capture_rate_limit', function() {
	return 50;
} );
Use the aiovg_email_capture_rate_limit_global filter the same way to change the site-wide limit (return 0 to turn it off), or return false from aiovg_email_capture_rate_limit_enabled to switch both limits off, for example while testing.
Coming Soon
We are working on third-party email provider integrations — including Mailchimp, FluentCRM, ActiveCampaign, MailerLite, Webhooks, and more — as part of our PRO version. These will allow captured leads to be automatically synced to your email marketing platform.
The Email & Lead Capture feature is a powerful way to grow your audience directly from your video content. By gating videos at the right moment — before, during, or after playback — you can capture qualified leads without requiring a separate opt-in form or third-party tool. Choose which videos ask and how often, send each lead to the right inbox the moment it arrives, and combine it with the per-video override and domain blocking options for full control over your lead generation strategy.